2015-08-21
 703
703At first, set IP camera parameter:
This device supports multi-version Onvif protocols, compatible with main brand IP cameras. Take below brands as example:

Before connect the IP camera with NVR, please make sure that the IP addresses of the IP camera and the NVR are in a same network section, and the main stream and sub stream are adjusted to be the suggested values (main stream: 2048k, sub stream: 512k), otherwise, these problems may appear: the NVR cannot search the IP camera, the image cannot be connected, the image is not fluent, the image quality is bad and so on.
Connect the NVR with the network cable, and the switch in the LAN. After booting, click  and enter the system configure interface to set the network parameters including the IP address, subnet mask, network gateway of the NVR. User can run the command ping through the PC in the LAN to ping the IP of the NVR to see if the NVR has connected with the LAN.
 Notice: IP address might conflict with each other, please set the gateway correctly, or NVR might fail to work. Please ensure all the IP addresses in LAN are unique.

Then click the right mouse button and appear the below menu:
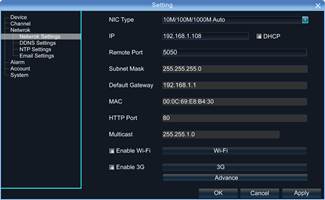
Device port setting: the default is 5050, if there are several NVRs in the LAN, need to change this port is for login NVR by IE, CMS. Login NVR by mobile, the port should be +3 based on the device port.
HTTP port: the default port is 80, suggest modifying it. This port is for login NVR by IE, input NVR IP address or domain name; need to add colon and HTTP port number.

Example: show as the above picture, access NVR by IE in LAN, first add 2 forwarding rules in the router, the IP address is 192.168.1.108, the forwarding ports are 5050-5053, 80. Please input http://192.168.1.108:80 at IE browser and download ActiveX, then close the IE before install the ActiveX, after installing it successfully, then reopen IE with http://192.168.1.108:80, it will show login menu, input device port:5050, user name: admin, no password, can access NVR.
If access NVR by IE in WAN, please use static IP or dynamic domain name, the operation is same as LAN
Click Ў°IP Channel SettingЎ±Ё¤Manual, will appear below interface:
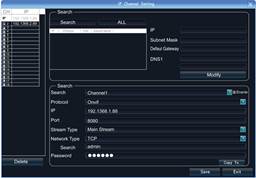
To connect IP camera, click Ў°SearchЎ±, NVR will auto search the IP cameras in LAN, then it will appear IP camera list:
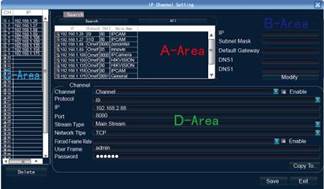
A –Area is cameras IP address searching area——click Search to get the camera IP addresses in LAN
B- Area is camera IP address modification area——double click IP camera in
A area, B area will show camera network data, some cameras can change IP
address directly in B area
C- Area is cameras channel setting area——according to the selection sequence
in A zone, to sort the 1-36 channels image order. Select All to add IP cameras to
the all channel by one click.
D-Area is camera user name and password filling area——this area is camera network parameter
 2> Automatic Search
Right click to select ЎѕIP channel SettingЎїЁ¤Auto
If the IP camera has private protocol with NVR, NVR will assign IP address to the camera automatically, after finish the searching, will connect the image automatically. Camera IP addresses will be added automatically in the preview channel area.
Finish adding IP camera and click Save, then the image of the IP camera will appear in the channel.
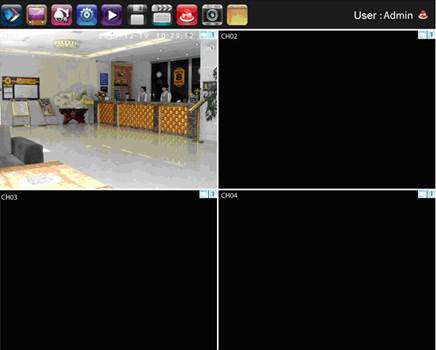
Below are some main functions of the NVR:
The menu consists of display setting, PTZ, setting, playback, record, alarm, capture and file manager etc.
The device enters the real-time monitoring screen after normal booting. There are superposed date, time, and channel name of every channel. Icons of record, 3D positioning and alarm status will appear in the right upper corner.