2020-04-12
 186
186It's said that you can never have enough money, and the same seems to hold true for RAM, especially if you do a lot of graphics-intensive work or gaming. Next to the CPU itself, RAM is the most important factor in computer performance. If you don't have enough, adding RAM can make more of a difference than getting a new CPU!
If your system responds slowly or accesses the hard drive constantly, then you need to add more RAM. If you are running Windows 95/98, you need a bare minimum of 32 MB, and your computer will work much better with 64 MB. Windows NT/2000 needs at least 64 MB, and it will take everything you can throw at it, so you'll probably want 128 MB or more.
Linux works happily on a system with only 4 MB of RAM. If you plan to add X-Windows or do much serious work, however, you'll probably want 64 MB. Apple Mac OS systems will work with 16 MB, but you should probably have a minimum of 32 MB.
The amount of RAM listed for each system above is estimated for normal usage -- accessing the Internet, word processing, standard home/office applications and light entertainment. If you do computer-aided design (CAD), 3-D modeling/animation or heavy data processing, or if you are a serious gamer, then you will most likely need more RAM. You may also need more RAM if your computer acts as a server of some sort (Web pages, database, application, FTP or network).
Another question is how much VRAM you want on your video card. Almost all cards that you can buy today have at least 8 MB of RAM. This is normally enough to operate in a typical office environment. You should probably invest in a 32-MB graphics card if you want to do any of the following:
· Play realistic games
· Capture and edit video
· Create 3-D graphics
· Work in a high-resolution, full-color environment
· Design full-color illustrations
When shopping for video cards, remember that your monitor and computer must be capable of supporting the card you choose.
How to Install RAM
Most of the time, installing RAM is a very simple and straightforward procedure. The key is to do your research. Here's what you need to know:
· How much RAM you have
· How much RAM you wish to add
· Form factor
· RAM type
· Tools needed
· Warranty
· Where it goes
In the previous section, we discussed how much RAM is needed in most situations. RAM is usually sold in multiples of 16 megabytes: 16, 32, 64, 128, 256, 512. This means that if you currently have a system with 64 MB RAM and you want at least 100 MB RAM total, then you will probably need to add another 64 MB module.
Once you know how much RAM you want, check to see what form factor (card type) you need to buy. You can find this in the manual that came with your computer, or you can contact the manufacturer. An important thing to realize is that your options will depend on the design of your computer. Most computers sold today for normal home/office use have DIMM slots. High-end systems are moving to RIMM technology, which will eventually take over in standard desktop computers as well. Since DIMM and RIMM slots look a lot alike, be very careful to make sure you know which type your computer uses. Putting the wrong type of card in a slot can cause damage to your system and ruin the card.
You will also need to know what type of RAM is required. Some computers require very specific types of RAM to operate. For example, your computer may only work with 60ns-70ns parity EDO RAM. Most computers are not quite that restrictive, but they do have limitations. For optimal performance, the RAM you add to your computer must also match the existing RAM in speed, parity and type. The most common type available today is SDRAM.
Before you open your computer, check to make sure you won't be voiding the warranty. Some manufacturers seal the case and request that the customer have an authorized technician install RAM. If you're set to open the case, turn off and unplug the computer. Ground yourself by using an anti-static pad or wrist strap to discharge any static electricity. Depending on your computer, you may need a screwdriver or nut-driver to open the case. Many systems sold today come in toolless cases that use thumbscrews or a simple latch.

| 
|
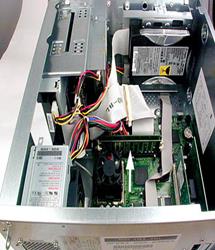
| To install more RAM, look for memory modules on your computer's motherboard. At the left is a Macintosh G4 and on the right is a PC. | |
The actual installation of the memory module does not normally require any tools. RAM is installed in a series of slots on the motherboard known as the memory bank. The memory module is notched at one end so you won't be able to insert it in the wrong direction. For SIMMs and some DIMMs, you install the module by placing it in the slot at approximately a 45-degree angle. Then push it forward until it is perpendicular to the motherboard and the small metal clips at each end snap into place. If the clips do not catch properly, check to make sure the notch is at the right end and the card is firmly seated. Many DIMMs do not have metal clips; they rely on friction to hold them in place. Again, just make sure the module is firmly seated in the slot.
Once the module is installed, close the case, plug the computer back in and power it up. When the computer starts the POST, it should automatically recognize the memory. That's all there is to it!
For more information on RAM, other types of computer memory and related topics, check out the links on the next page.
Read-only memory (ROM), also known as firmware, is an integrated circuit programmed with specific data when it is manufactured. ROM chips are used not only in computers, but in most other electronic items as well. In this edition of HowStuffWorks, you will learn about the different types of ROM and how each works. This article is one in a series of articles dealing with computer memory, including:
· How Computer Memory Works
· How RAM Works
· How Virtual Memory Works
· How Flash Memory Works
· How BIOS Works
Let's start by identifying the different types of ROM.
ROM Types
There are five basic ROM types:
· ROM
· PROM
· EPROM
· EEPROM
· Flash memory
Each type has unique characteristics, which you'll learn about in this article, but they are all types of memory with two things in common:
· Data stored in these chips is nonvolatile -- it is not lost when power is removed.
· Data stored in these chips is either unchangeable or requires a special operation to change (unlike RAM, which can be changed as easily as it is read).
This means that removing the power source from the chip will not cause it to lose any data.
ROM at Work
Similar to RAM, ROM chips (Figure 1) contain a grid of columns and rows. But where the columns and rows intersect, ROM chips are fundamentally different from RAM chips. While RAM uses transistors to turn on or off access to a capacitor at each intersection, ROM uses a diode to connect the lines if the value is 1. If the value is 0, then the lines are not connected at all.
 Figure 3. BIOS uses Flash memory, a type of ROM. Figure 3. BIOS uses Flash memory, a type of ROM.
|
A diode normally allows current to flow in only one direction and has a certain threshold, known as the forward breakover, that determines how much current is required before the diode will pass it on. In silicon-based items such as processors and memory chips, the forward breakover voltage is approximately 0.6 volts. By taking advantage of the unique properties of a diode, a ROM chip can send a charge that is above the forward breakover down the appropriate column with the selected row grounded to connect at a specific cell. If a diode is present at that cell, the charge will be conducted through to the ground, and, under the binary system, the cell will be read as being "on" (a value of 1). The neat part of ROM is that if the cell's value is 0, there is no diode at that intersection to connect the column and row. So the charge on the column does not get transferred to the row.
As you can see, the way a ROM chip works necessitates the programming of perfect and complete data when the chip is created. You cannot reprogram or rewrite a standard ROM chip. If it is incorrect, or the data needs to be updated, you have to throw it away and start over. Creating the original template for a ROM chip is often a laborious process full of trial and error. But the benefits of ROM chips outweigh the drawbacks. Once the template is completed, the actual chips can cost as little as a few cents each. They use very little power, are extremely reliable and, in the case of most small electronic devices, contain all the necessary programming to control the device. A great example is the small chip in the singing fish toy. This chip, about the size of your fingernail, contains the 30-second song clips in ROM and the control codes to synchronize the motors to the music.
PROM
Creating ROM chips totally from scratch is time-consuming and very expensive in small quantities. For this reason, mainly, developers created a type of ROM known as programmable read-only memory (PROM). Blank PROM chips can be bought inexpensively and coded by anyone with a special tool called a programmer.
PROM chips (Figure 2) have a grid of columns and rows just as ordinary ROMs do. The difference is that every intersection of a column and row in a PROM chip has a fuse connecting them. A charge sent through a column will pass through the fuse in a cell to a grounded row indicating a value of 1. Since all the cells have a fuse, the initial (blank) state of a PROM chip is all 1s. To change the value of a cell to 0, you use a programmer to send a specific amount of current to the cell. The higher voltage breaks the connection between the column and row by burning out the fuse. This process is known as burning the PROM.
 Figure 4 Figure 4
|
PROMs can only be programmed once. They are more fragile than ROMs. A jolt of static electricity can easily cause fuses in the PROM to burn out, changing essential bits from 1 to 0. But blank PROMs are inexpensive and are great for prototyping the data for a ROM before committing to the costly ROM fabrication process.
EPROM
Working with ROMs and PROMs can be a wasteful business. Even though they are inexpensive per chip, the cost can add up over time. Erasable programmable read-only memory (EPROM) addresses this issue. EPROM chips can be rewritten many times. Erasing an EPROM requires a special tool that emits a certain frequency of ultraviolet (UV) light. EPROMs are configured using an EPROM programmer that provides voltage at specified levels depending on the type of EPROM used.
Once again we have a grid of columns and rows. In an EPROM, the cell at each intersection has two transistors. The two transistors are separated from each other by a thin oxide layer. One of the transistors is known as the floating gate and the other as the control gate. The floating gate's only link to the row (wordline) is through the control gate. As long as this link is in place, the cell has a value of 1. To change the value to 0 requires a curious process called Fowler-Nordheim tunneling. Tunneling is used to alter the placement of electrons in the floating gate. An electrical charge, usually 10 to 13 volts, is applied to the floating gate. The charge comes from the column (bitline), enters the floating gate and drains to a ground.
This charge causes the floating-gate transistor to act like an electron gun. The excited electrons are pushed through and trapped on the other side of the thin oxide layer, giving it a negative charge. These negatively charged electrons act as a barrier between the control gate and the floating gate. A device called a cell sensor monitors the level of the charge passing through the floating gate. If the flow through the gate is greater than 50 percent of the charge, it has a value of 1. When the charge passing through drops below the 50-percent threshold, the value changes to 0. A blank EPROM has all of the gates fully open, giving each cell a value of 1.
To rewrite an EPROM, you must erase it first. To erase it, you must supply a level of energy strong enough to break through the negative electrons blocking the floating gate. In a standard EPROM, this is best accomplished with UV light at a frequency of 253.7. Because this particular frequency will not penetrate most plastics or glasses, each EPROM chip has a quartz window on top of it. The EPROM must be very close to the eraser's light source, within an inch or two, to work properly.
An EPROM eraser is not selective, it will erase the entire EPROM. The EPROM must be removed from the device it is in and placed under the UV light of the EPROM eraser for several minutes. An EPROM that is left under too long can become over-erased. In such a case, the EPROM's floating gates are charged to the point that they are unable to hold the electrons at all.