2015-08-21
 567
567Click  , and the below interface will show:
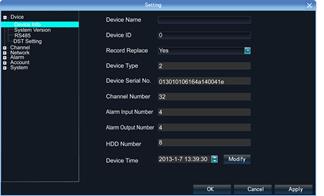
3.3.5.1 Device Parameters
 [Device Info] Check and modify the basic information of the device.
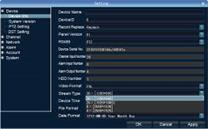
Click ЎѕSettingЎїЁ¤DeviceЁ¤Device info to check device spec. information and time setting
 Notice: Attention: select mode according the connected IP camera channels and resolution, after change the model,click save and reboot the device.
When the image is good in 9/16/25/26 screen modes, after double click the image to zoom, the image is stuck or become black screen change to 1080 mode can solve it.
[System Version] check the system version and time, when do software update, need to check version first to avoid updating failure and damage the device.
[RS232] Can set RS232 serial port.
[RS485] Can set the RS485 serial port.
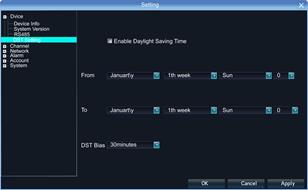
[DST Setting] Tick Ў°DSTЎ± check box, then click the set button to set the start time and end time of DST.
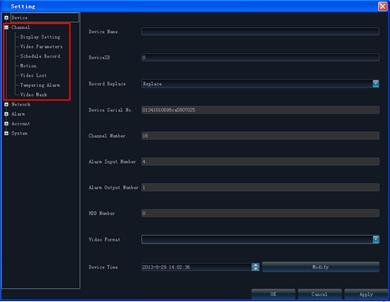
3.3.5.2 Channel Parameters
[Display Settings] The configuration parameter of every channel can be modified.
1) Camera Name: You can modify the name of the specified channel.
2) Time Format: You can select different time formats for the specified channel.
3) Date Format: You can select different date format for the specified channel.
4) Display Week: Can select different week display status for the specified channel.
5) OSD Position: You can select any position for the OSD of the specified channel.
6) Display Parameters: Can set the brightness, contrast, saturation and hue for the specified channel.
7) Video Format: There are PAL and NTSC for selection.
8) Copy To: Copy the configuration parameters to other channels.
[Video Parameters] The setting parameters of every channel can be modified.
1) Encoding Type: Main Stream (Normal), Sub Stream, Main Stream (Event) for selection.
Main Stream Јєdouble click to show single image or full screens image are main stream, also recording playback is main stream.
Sub Stream Јє9/16/25/36 screens display are using sub stream, IE or mobile reviewing are sub stream also.
Main Stream (Event)Јє motion detection and alarm trigger recording are using this
2) Stream Type: Video, Video&Audio for selection.
3) 3Ј©Resolution: There are CIF/QCIF/4CIF/2CIF main stream resolution types for selection..
4) Bitrate Type: Constant and Variable for selection.
5) Frame Rate: Select different value from the drop-down list, the default value is Ў°Full FrameЎ±.
6) Video Quality: Select different image quality as needed, it is default to Ў°HighestЎ±.
7) Copy To: Copy the configuration parameters to other channels.
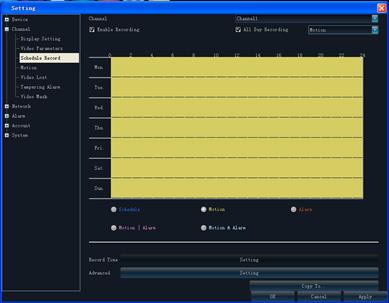
[Schedule Record] You can set different types of record plan for each channel.
1) Enable Recording: Tick the small box before Ў°Enable RecordingЎ± will start recording.
2) All Day Recording: Tick the small box before Ў°All Day RecordingЎ± to start all day recording, then you can select schedule recording, motion recording, alarm recording, command recording etc.
3) Record Time: You can setup by 8 separate time periods.
4) Advanced Settings: You can set the prerecord time and post record time.
5) Copy To: Copy the configuration parameters to other channels.
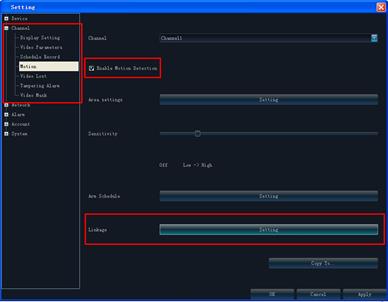
[Motion Detection] The parameters of each channel can be modified.
1) Area settings: Select the motion detection area, press the left mouse button and drag to the area which you want to set motion detection, click OK.
2) Alarm Schedule: Set the time intervals of alarm.
3) Linkage: Select the linkage way which you need.
4) Copy To: Copy the configuration parameters to other channels.
Onvif protocol does not support above function
l Operation Instruction:
1 Select Motion in the menu of setting
2 Select Enable Motion Detection
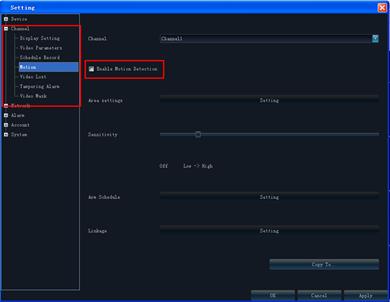
3 After do Area settings and Arm Schedule, then do Linkage
4 Do the setting according your necessary in the pop out screen, like Alarm on Monitor,
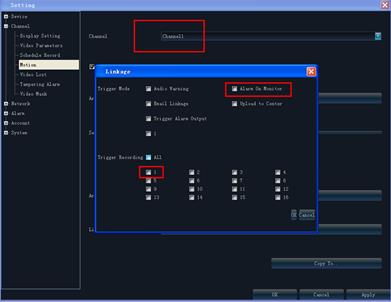
5 Select Motion recording, if need can open pre-recording in advance
[Video Lost] Can modify the parameters of each channel.
1) Ў°Alarm ScheduleЎ±: Set the time intervals of alarm.
2) Ў°LinkageЎ±: Select the linkage way which you need.
3) Ў°Copy ToЎ±: Copy the configuration parameters to other channels.
Onvif protocol does not support above function
[Video Tampering] The parameters of each channel can be modified.
1) Area settings: Select the motion detection area, press the left mouse button and drag to the area which you want to set motion detection, click OK.
2) Alarm Schedule: Set the time intervals of alarm.
3) Linkage: Select the linkage way which you need.
4) Copy To: Copy the configuration parameters to other channels.
Onvif protocol does not support above function
[Video Mask] The parameters of each channel can be modified.
1) Area settings: Select the motion detection area, press the left mouse button and drag to the area which you want to set motion detection, click OK.
2) Copy To: Copy the configuration parameters to other channels.
Onvif protocol does not support above function
3.3.5.3 Network Parameters
[Network Settings]
The network basic parameters of the device can be modified.
1) NIC Type: there are different network card types for selections.
2) IP: enter corresponding numbers to modify the IP address.
3) Obtain Auto: Auto search IP function. When open DHCP, the IP/Subnet Mask/Default Gateway cannot be set; If the current DHCP is valid, then the IP/Subnet Mask/ Default Gateway will show the value obtained by DHCP; if the current DHCP is invalid, IP address etc. will show 0.
4) Device Port: Enter the corresponding device port.
5) Subnet Mask: Enter the corresponding IP subnet mask.
6) Default Gateway: Enter the corresponding gateway address.
7) MAC: Display the MAC address current network port.
8) HTTP Port: It is default to 0.
9) Multicast: Enter the corresponding multicast address.
[Wi-Fi & 3G setting]
1) Enable Wi-Fi: Tick the box before Ў°Enable Wi-FiЎ± and click Ў°Wi-FiЎ±, and enter the following interface:
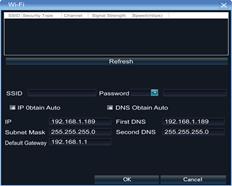
Click Ў°RefreshЎ±, and find the WiFi router and double click. Then input the ip address, subnet mask, default gateway, DNS server address1 and DNS server address 2.
2) Enable 3G: Tick the box before Ў°Enable 3GЎ±, click Ў°3GЎ± to enter the following interface:
a. The access number of the China Unicom is *99# APN address is: 3GNET.
b. The access number of the China Telecom is #777 APN address is blank.
c. The access number of the China Mobile is *99***1# APN address is blank.
3) Advance:
a) DNS Server Address1: The IP address of the DNS server.
b) DNS Server Address2: The standby IP address of the DNS server.
c) Alarm Host IP: Enter the IP address of the alarm host.
d) Alarm Host Port: Enter the port of the alarm host.
e) Enable PPPOE: you can enable the PPPOE service:
Ё№ Input the PPPOE user name.
Ё№ Input the dynamic address of the device.
Ё№ Confirm password.
[DDNS Settings] Through the DDNS server, there should be a PC with fixed IP address on the internet and run this DDNS server on this PC.
1) Select DDNS server type (There are IP Server, Dyndns, Peanuthull for selection).
2) Input the server name.
3) Input the port.
4) Input the user name.
5) Input the password.
6) Confirm the password.
7) Input the standby domain name.
[NTP Settings] Enable NTP timing.
1) Server Address: Input the IP of the NTP server.
2) NTP Port: This SNTP only supports TCP transmission. It is default to 123.
3) Synchronize every: Input the time interval needed to be adjusted.
4) Select Time Zone: Select the time zone of different places.
5) GMT: You can do fine adjustment of time.
[Email Settings] Setup E-mail.
1) Email Address: Input the email address.
2) Password: Input the email password.
3) PWD Confirm: Confirm the password.
4) Receiver: Input the email address and user name of the receiver.
5) Interval: Select the interval of sending email.
6) SMTP Server: Input the SMTP server address.
7) Port: Input the SMTP server port.
3.3.5.4 Alarm & Exception
[Alarm Input] Setup alarm input.
1) Alarm Schedule: Set the time intervals of alarm.
2) Linkage: Select the way of linkage. PTZ linkage: select the channel number and the action for linkage (preset, patrol, and pattern) to the specified point and click ok.
3) Copy: Copy the configuration to the other channels.
4) [Alarm Output] Setup alarm output.
5) Alarm Schedule: Set the time intervals of alarm.
6) Linkage: Select the way of linkage.
7) [Exception] Setup abnormality
8) HDD Full: When there is no space in the HDD, it can trigger corresponding linkage type.
9) Disk Fault: When there is HDD read and write fault alarm, it can trigger corresponding linkage type.
10) Network Broken: When there is network broken alarm, it can trigger corresponding linkage type.
11) IP Address Conflict: When there is network IP conflict alarm, it can trigger corresponding linkage type.
12) Illegal Access: When there is illegal access alarm, it can trigger corresponding linkage type.
13) Video Output Standard Mismatch: When the input and output format do not match the setting format, it can trigger corresponding linkage type.
14) Video Signal Exception: When there is video signal abnormality, it can trigger corresponding linkage type.
3.3.5.5 Account Parameters
[Account Setting] You can add user, modify user, set user authority, delete user.
1) Add User: You can set user name, password, confirm password, user type and bind the IP address.
2) Modify User: You can modify the user name, password, confirm password, user type and bind the IP address.
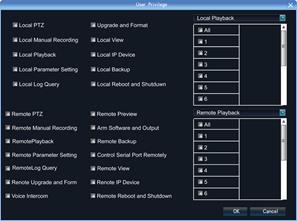
3) User Privilege: You can setup the privilege of the new added user.
4) Delete User: Delete the new added user.
[User Online]: View the user connected with the NVR, logging way, logging time and IP address.
3.3.5.6 HDD Settings
You can format the HDD and view the HDD capacity, the free space and status etc.
3.3.5.  7 System Upgrade
Right click mouse, click ЎѕSettingЎїЁ¤SystemЁ¤Update,insert the USB storage device into the NVR, click Browse to find the upgrade file, and click Upgrade.
Upgrade include:firmware upgrade,boot screen image upgrade,patch upgrade.
Except USB memory upgrade, it also support upgrade by network.
Note: when the NVR is upgrading,donЎЇt perform any other operations or power off, otherwise NVR will fail to enter the system,and have to send back to factory for repairing.
After upgrading,the device need to be rebooted.