2020-08-05
 152
152This detailed tutorial will show you how to turn long webform into a wizard with “steps left” information. A plugin is also available for download.

If you would, for whatever reason, have a large webform all fields shoud be semantically divided into fieldsets. Each fieldset would clearly describe each group of fields. Although many examples on the web today look different, this is how it should be.
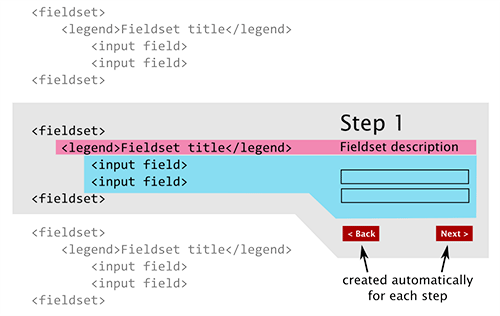
So, we can say that each group of fields represent a sub task of a larger task – filling the entire web form. Thus, each sub task can become a step with a description, input fields and navigation that is common for wizard forms – back and next.The entire process can be done in several simple steps.
1. Create “steps”
The code should look like the example below.
<form id="SignupForm" action=""> <fieldset> <-- input fields --> </fieldset> <fieldset> <-- input fields --> </fieldset> <fieldset> <-- input fields --> </fieldset></form>Let’s explain the following code. In order to determine how much steps there will be, we need to select all fieldsets and get the size of this wrapped set. Next, we iterate through this wrapped set (that returned all fieldsets), wrap each fieldset into a div and append a paragraph that will hold “back” and “next” buttons.
Now comes the funny part. If this is a first fieldset in wrapped set, we’ll create “next” button only and make this step visible. If it is the last fieldset in wrapped set, we’ll create only “back” button. In all other cases we’ll create both buttons. Methods for creating buttons will be explained later in this tutorial.
var steps = $("#SignupForm fieldset");var count = steps.size();
steps.each(function(i) { $(this).wrap("<div id='step" + i + "'></div>"); $(this).append("<p id='step" + i + "commands'></p>");
if (i == 0) { createNextButton(i); // to do selectStep(i); // to do } else if (i == count - 1) { $("#step" + i).hide(); createPrevButton(i); // to do } else { $("#step" + i).hide(); createPrevButton(i); // to do createNextButton(i); // to do}}
Now let’s explain how to create buttons and how users will actually move through the wizard.