2018-01-08
 455
455If you’re not wanting to upload the entire contents of your DV tape Windows Movie Maker allows for uploading shorter clips in to the editor. Following the same directions above for connecting your camera and selecting a format to upload to you’ll want to then select Only import parts of the videotape to my computer then Next. Now navigate to the start of the clip(s) you want to import and choose Start Video Import.
Once you’ve started importing the video will begin playing automatically. When you get to the end point in the clip you want uploaded just click Stop Video Import and the video imports and saves as an individual clip. Simply repeat hitting Start and Stop Video Import for each of the clips you wish to upload.
How to upload photo and audio files
Importing photo and audio files into Windows Movie Maker is simple and requires just a couple steps. While in the Movie Maker window click Add videos and photos and locate where on your computer the files are you wish to upload. Highlight the files and click Open to upload them in to the program.

Editing video clips
With the content you wish to edit uploaded to your computer we can begin taking a look at the editing process.
If the uploaded video is not yet in the Movie Maker program navigate to the Add videos and photos button located under the Home tab. Locate the files you wish to import and select Open to add them to your movie’s timeline. The program will automatically break the sequence up in to 10 second segments for easy navigation of the timeline. Your sequence stays as one fluid video so you’ll still need to split any part of the clip you wish to edit singularly or delete.
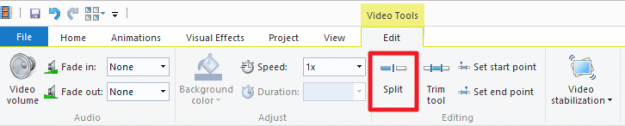
Splitting clips
To cut up any video imported to Movie Maker first navigate to the Edit tab under Video Tools and locate the Split button. In your video sequence either drag the black cursor or play the video and hit stop where you want to split your clip and click Split. Movie Maker will now split the clip at the exact time you’ve chosen and has created two separate clips. You’ll need to split your clip a second time to create an individual clip you can either move to another part of the sequence, add a transition to, or delete altogether.
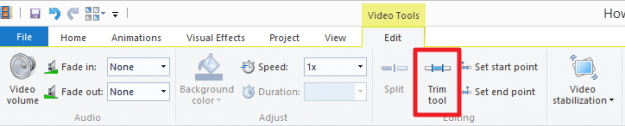
Trimming clips
Trimming clips in your sequence is a worthwhile tool if you want to get rid of a part of a clip, but not delete it entirely. Movie Maker’s Trim tool allows you to select a clip within your sequence and trim as much out of the middle of the clip as you want and it will join the beginning and end to form a new sequence. The trimmed part of the clip does not delete, rather the program hides what you’ve trimmed and will not show up during playback.